Assignment 2 Commentary
For this assignment, we were tasked with telling a story using 6 to 9 photographic images without the use of any text or dialogue. The brief stated that the story could be fictional or non-fictional, but should be in a linear narrative. Because we had to communicate a story visually, I turned to the world of film for some inspiration.
During recess week, I chanced upon a Netflix docuseries titled “The Movies That Made Us”, which gave a behind the scenes look at how some classic films were made. Each episode would go into great detail to regale the entire process of making a film — from the storyboarding and casting to the filming and editing process.
Thinking back, the most memorable episode for me was the episode that detailed the making of “Jurassic Park”. I was in awe at how detailed the storyboards for the film were, looking at it was akin to watching the film, as I felt like I was ‘watching’ the action-packed scenes unfold just by looking at the storyboards itself. It was then when I realized how a masterfully made storyboard would be able to capture the imagination of the storyboard artist and convey it to the production crew, thereby bringing his or her vision to life.
This inspired me to tell a story about dinosaurs as well as I wanted to capture the same sense of awe that the characters in the film felt when they saw their first dinosaur. And with that, I started to plan my storyboard.

In the first three frames, I wanted to create a sense of awe and wonder a character might have driving around the expansive dinosaur park and seeing all the different types of dinosaurs. To capture that feeling, I decided to use wide shots to set the scene.
The remaining 6 frames were meant to be part of an action sequence depicting a chase scene after the main character accidentally bumps into a dinosaur. I wanted to use photos that would make the viewer feel tense and suspense, which I believe could be achieved by using close up shots as it allows the viewer to immediately focus on what is happening in the image.
When capturing the photos, the biggest challenge I faced was lighting, because the photoshoot was done outdoors, which meant that I was at the whim of the sun. However, I managed to overcome that challenge by working quickly to capture as many shots as I could whenever there was a passing cloud covering the sun, this was done to ensure that the photos would not be overexposed.
Photo selection process
I believe that this is the most important part in the assignment as the photos are what conveys the vision of the storyboard artist, by acting as a bridge between the imaginary realm to the real world.
Here is what went through my mind as I sifted through the photos I took to sieve out the best ones to use in my final prototype.
Rejected image 1

This image was rejected due to compositional reasons, as I thought it would be better for the main character and the car to be at the right side of the frame instead of being in the middle of the frame. By placing the character at the right side of the frame, it would show that there is a lot more space for the character to explore in the dinosaur park. Doing so would also convey a sense of exploration to the viewer as it would seem like the character has just embarked on his adventure.

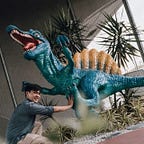
Rejected image 2

I rejected this image as I felt that it had a very narrow depth of field, resulting in the camera focusing on the main character rather than the dinosaur. In this case, it would be better to focus on the dinosaur as this image was meant to evoke a sense of awe in the viewer as it is the first time they see a dinosaur in the story.

Rejected image 3

This image was rejected as I felt that a wide shot does not convey a sense of suspense in the viewer, as opposed to using a close-up shot, which would lead the viewer to question what the main character had knocked into.

Rejected image 4

I did not select this image as I felt that it was too passive and did not convey a sense of speed and acceleration to indicate that the main character was about to collide into something. Hence, it would be unsuitable for use in a fast-paced action sequence. I decided to use the image below instead.

This image shows the collision as it is occuring which made me feel that it is more suitable to be used in an action sequence as it clearly shows the viewer what is happening.
Creating the final prototype
I used Illustrator to create my final prototype, as the Clipping Mask function would be useful in this scenario. Firstly, I used the rectangle tool to create equally sized boxes for me to place my images in. The grid was made visible to ensure that the boxes were all aligned properly.

Next, I placed the image I wanted to fit into my box onto the artboard and arranged it such that it was behind my rectangular box.

Afterwards, I selected both the image and the rectangular box to create a clipping mask.

The process was then repeated until all the boxes were filled up with the images!
Post Critique
Some of the comments that I received from the critique session were to:
1. Add numbers to the panel and make images smaller if not it feels abrupt
2. Remove images 2 and 3 as they do not value-add to the storyline
3. Add in a frame of the dinosaur turning around before the ‘face-off’ scene (image 5)
4. Retake the image of the main character getting eaten (image 9) as the image looks much warmer than the other images
Taking the comments into consideration, I added in a medium shot of the dinosaur turning around to face the main character before the close up of the ‘face-off’ between them to show the tension and made the other relevant changes.
Upon reflecting, I also noticed that from image 3 to image 4, I broke the 180-degree rule, which states that the camera should be kept on one side of an imaginary axis between two characters, so that the first character is always frame right of the second character. Hence, the transition from image 3 to 4 would have been disorientating for the viewer. This realization further compelled me to remove the image 2 and 3.


I believe that the changes made to my final prototype after the critique helped to make my storyline more coherent and better paced. As the main idea in my story is of the main character getting chased and eaten by the dinosaur, in my final prototype, I focused more on the sequence of events leading up to the chase.